Tutorial 11: Stages and Campaigns
This tutorial will cover integrating bullet, enemy, and boss functionality into a stage script and then into a campaign. This tutorial is based on version 11.2.0 of the engine.
What is a "stage script"?
There is no significant difference between a stage script and boss scripts. Both are StateMachines running on BehaviorEntities, though boss scripts run on boss objects (which are visible to the user) and stage scripts run on the LevelManager object in a scene (which is an invisible object located at (0,0).)
Let's start by observing a basic stage script. Open up the Assets/Danmokou/Tutorial/Example Stage scene. Take a look at the LevelManager object, which has a script attached named DMK Tutorial Example Stage Script. If you open it up, you can see the following:
// Go to https://dmk.bagoum.com/docs/articles/tstages.html for the tutorial.
pattern {
} {
	phase 0 {} {
		paction 0 {
			shiftphaseto(1)
		}
	}

	phase 8 { stage } {
		async "triangle-*/w" <> gcr2 40 inf <18h> {
			color { "red", "blue", "green" }
		} gsr2c 20 {
		} s rvelocity cx 2
	}
}
The structure of a stage script is actually simpler than a boss script, since we don't need to configure any metadata, positioning, or HP. Instead, we just mark each "normal" stage phase with the stage phase property. There are other phase properties for different types of phases, which will be clarified later in this tutorial.
If we start the scene, the script will start playing and we'll see bullets being fired from the center of the screen.

After 8 seconds (the phase timeout), the bullet firing will stop and the bullets will all be cleared. Also, the message "Cleared Stage phase:" will appear in the console log.
In most cases, we don't want the stage to fire bullets itself, but we instead want the stage to spawn enemies that fire bullets. Let's create a second phase that summons some fairy enemies:
	phase 8 { stage } {
		async "tfairy" <> gcr2 60 6 <> {
			preloop b{ hvar loop = i; }
		} summonr(none(pxy((-4 + 1 * loop), 5)), saction 0 {
			~ vulnerableafter 2
			movetarget(1.5, $(eoutsine), pxy((-3 + loop), 1 + loop * 0.3))
			sync "amulet-red/" <> gsr2 (2 + dc) <> {
				target ang Lplayer
			} s rvelocity px(lerp01(i / 5, 2, 0.7))
			wait(5)
		}, { hp 140 })
	}
This phase summons six small fairies that fly into the screen, fire some bullets, and then explode after 4 seconds. Normally, the fairies would start at (0,0) like the bullets from the previous stage, but since we use the summonr (Summon Rooted) command, we override the initial location of the fairies to the provided location pxy(-4 + loop, 5), which is offscreen. The fairies then execute the provided saction state machine, which contains a movetarget command that moves them into the screen. Also note the vulnerableafter command, which prevents the fairies from being damaged while they are flying into the screen. Once the enemy-specific state machines are complete or the phase ends, the enemies explode.
As with boss scripts, stage phases run in sequence, so if we put these phases one after the other, then they will run one after the other.
Summoning Bosses
There is a separate command to summon bosses within stage scripts: the boss command. This command summons a boss using its boss key. If we look at the Tutorial Game References linked on GameManagement in Example Stage, we can see one entry in Boss Metadata, named Tutorial Boss. It has the following information:
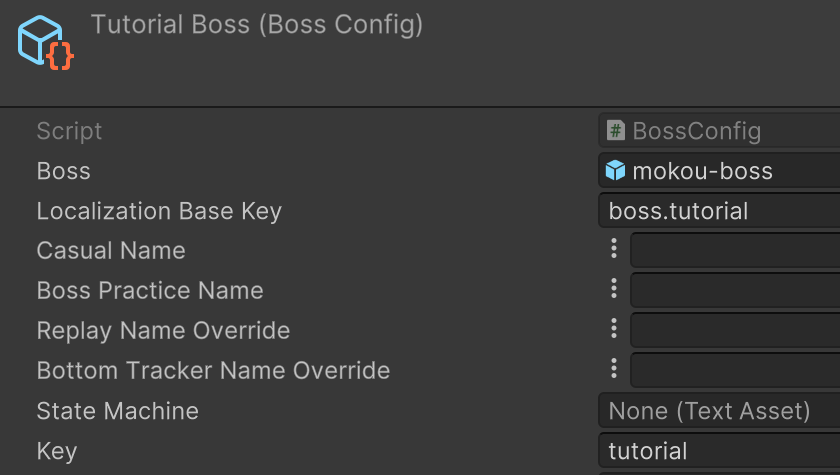
Since the key is "tutorial", we can summon this boss using the code boss("tutorial"). To put this in a phase, we do as follows:
	phase 0 { midboss } {
		saction 0 {
			boss "tutorial"
			shiftphase
		}
	}
(We can use the endboss or midboss property depending on whether there are more stage phases after the boss phase, but the only difference is the phase description in the bottom right of the UI.)
However, if we try to run this phase in the boss script, we will get the following error in the console:

The State Machine field on the boss configuration is what determines what the boss executes when it is summoned. However, it's currently null in the boss configuration. Let's set the StateMachine in the boss configuration to Example Complete Boss Script, enable the PlayerTeam object so we can actually fight the boss, and rerun the stage. Now, when the stage reaches the endboss phase, the Mokou tutorial boss will be summoned with three BoWaP phases.
After all three of Mokou's phases are done, the Mokou GameObject will be destroyed and the stage will continue to the next phase.
Announce/Dialogue Phases
Touhou stages usually include a visual effect at the beginning and end of a stage. If we create a stage phase with the announce property, then gameplay timers (such as the faith meter in the bottom left of the screenshot above) will be frozen, and the phase will be hidden from the practice menu. Announce phases are thus the best place to put purely graphical stage segments. Gameplay timers are also frozen during phases marked with the dialogue property, though dialogue phases are visible in the practice menu.
There are two helper commands for displaying visual effects in "announce" phases, though you can always write your own. These are stageannounce and stagedeannounce, which show the "Stage Announce" and "Stage Deannounce" images under the "UI (TH) > Ingame UI" GameObject. You can override these images individually in each stage scene, but the defaults are shown below:

We can make such phases as follows:
	phase 0 { announce } {
		saction 0 {
			stageannounce
			shiftphase
		}
	}

...

	phase 0 { announce } {
		saction 0 {
			stagedeannounce
			shiftphase
		}
	}
Note how the basic structure of the announce and boss phases is the same: we run some command (either boss or stage(de)announce) in a phase with an infinite timeout, and once it is finished, saction next runs the shiftphase command, which ends the phase.
The dialogue phase that we mentioned earlier operates similarly. This time, we use the executevn command, which takes a visual novel definition function in the source code as an argument.
	phase 0 { dialogue } {
		saction 0 {
			executevn $(ExampleVNScript1) "this_string_is_used_for_logging"
			shiftphase
		}
	}
ExampleVNScript1 is a method in the source code at Assets/Danmokou/MiniProjects/Plugins/Danmokou/VN/ExampleVNScript.cs. It uses the Suzunoya library to define a visual novel interaction. If you have a custom VN/dialogue engine, you can integrate it by writing a command similar to executevn which calls your own logic instead.
Creating a Campaign
The most common way to play stages in in a "campaign", which is a sequence of usually 5-6 stages that then has an ending. Let's take a look at how we can take several individual stage scripts and combine them into a campaign.
Since we access a campaign from the main menu, open up the "Example Main Menu" scene. If you try to run this scene, you'll just get a black screen and a lot of console errors, the second of which should be:
The game Default does not support ICampaignDanmakuGameDef
If you open Tutorial Game References, the first field Game Definition links to Default Empty Game Def. This class does not implement the ICampaignDanmakuGameDef interface, but the XML Main Menu Campaign script on Main Menu requires a campaign-type game. Let's switch this to a campaign definition.
- The difference between Game References and Game Definition is that Game Definition has a different type and different fields for each type of game (for example, a photo game uses SceneDanmakuGameDef instead of CampaignDanmakuGameDef), whereas Game References is uniform and contains the same fields regardless of the game type.
We can create a new campaign definition by right clicking in the project window and then selecting Create > Data > GameDef > BasicCampaign. The class BasicCampaignGameDef subclasses CampaignDanmakuGameDef, which implements the related interfaces. Note that in most cases, you'll actually want to write a separate subclass of CampaignDanmakuGameDef for each game, since GameDef is where you define achievements and game mechanics (eg. faith, meter, rank, score extends). You can see an example of this in the SiMP repo, which includes achievements, or the Touhou Jam 13 code, which includes custom mechanics linked through the CustomData property.
Set the Game Definition field on Tutorial Game References to this new GameDefinition. Opening the GameDefinition should show the following fields:
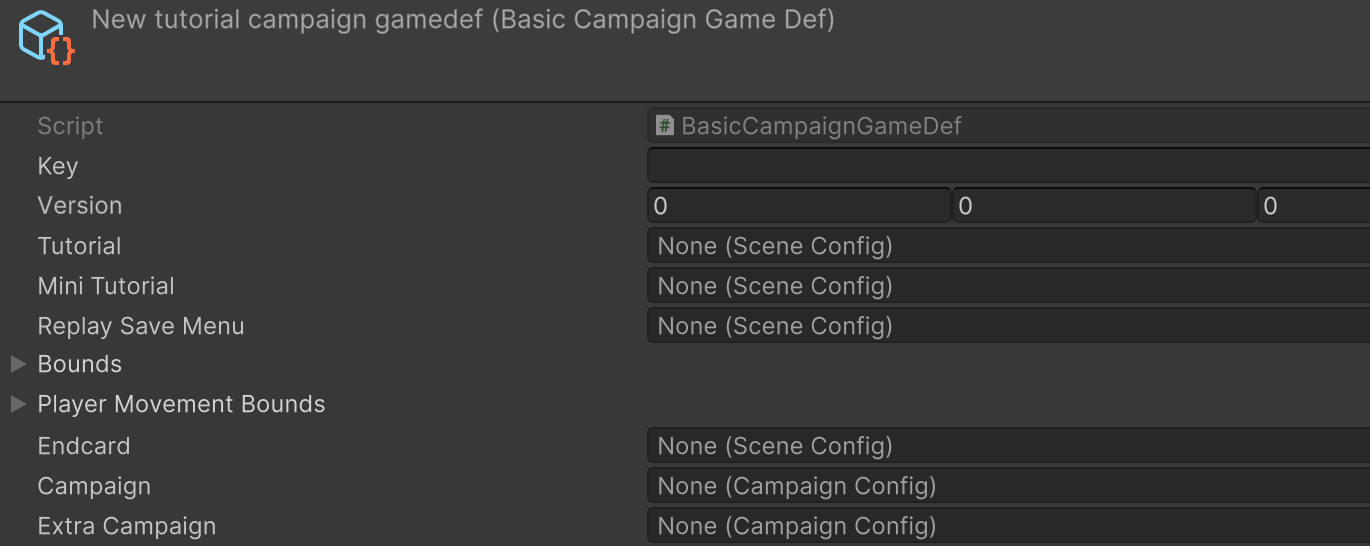
Fill in anything you like for Key. Link Replay Save Menu and Endcard to the existing ReplaySave/Endcard scene configs. Tutorial optionally links to a tutorial accessible from the main menu, and Mini Tutorial optionally links to a tutorial that automatically runs if the player hasn't finished the actual tutorial. The bounds fields already have default values based on the normal Touhou stage boundaries, so you don't need to change them.
The Campaign GameDefinition doesn't itself contain the stages or endings; that's handled by Campaign Config and linked through the Campaign/Extra Campaign fields, which respectively handle the "main game" campaign and the "extra stage" campaign. Let's create a new campaign (right click > Create > Data > Campaign Configuration) and link it to the Campaign field on our new GameDefinition. Opening it should show the following fields:
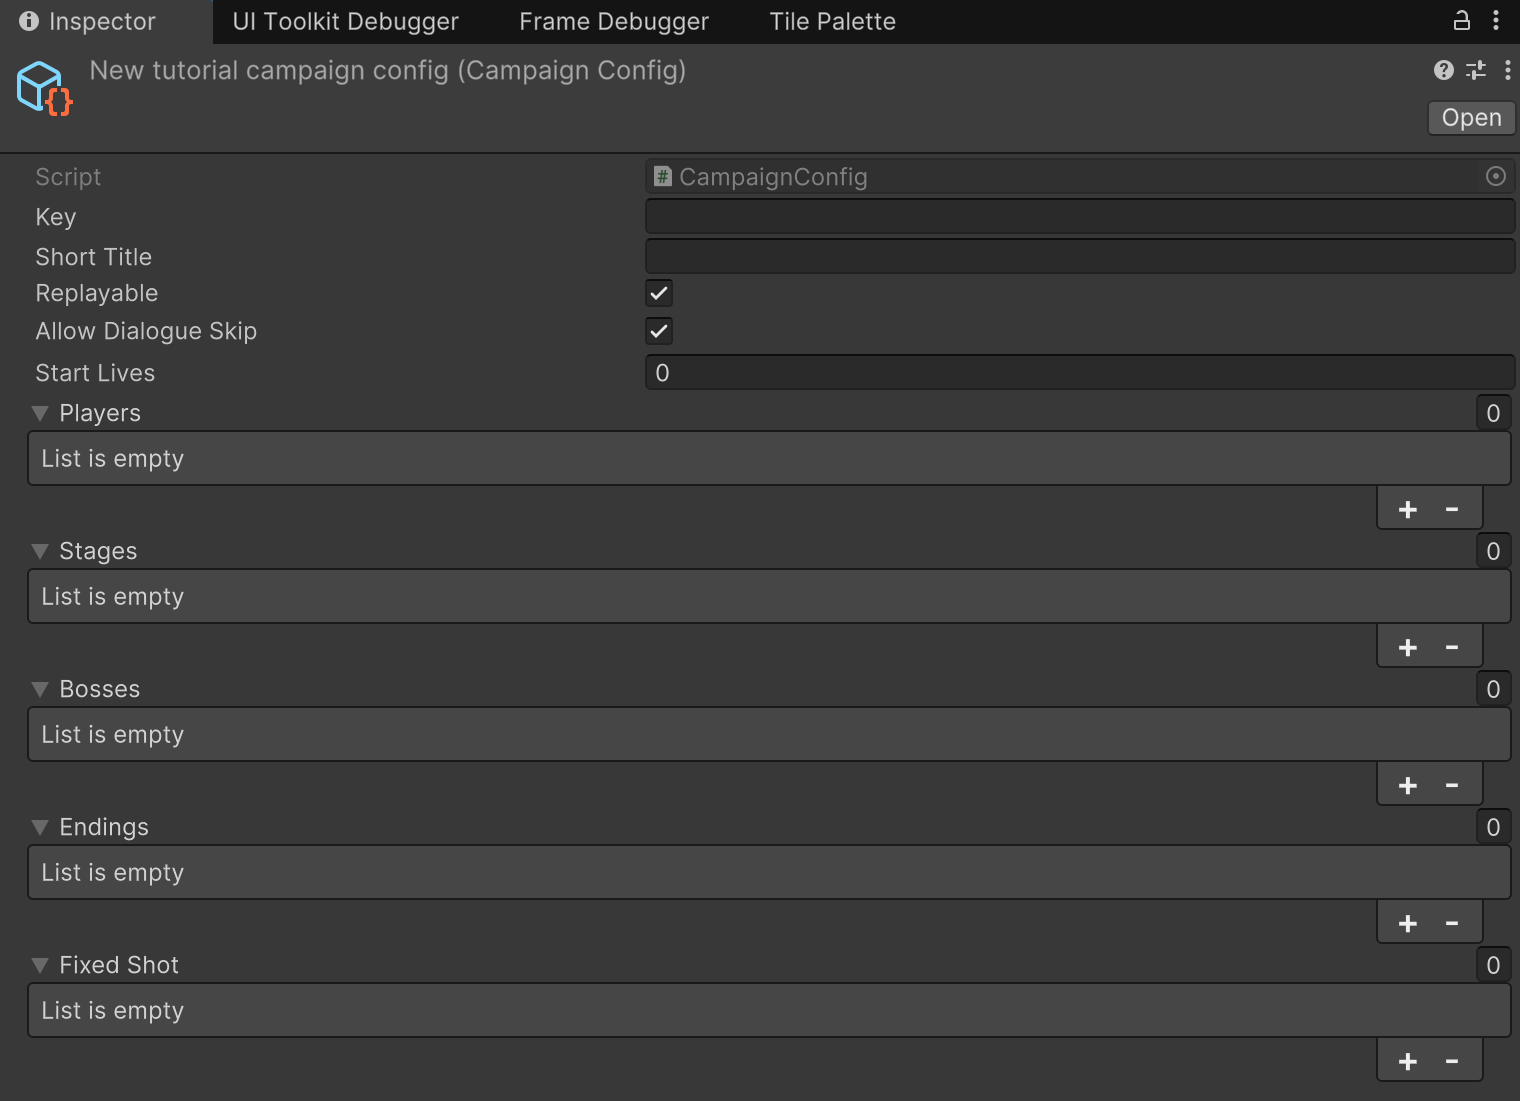
Fill in anything you like for Key and Short Title. Start Lives will default to 7 if the value here is <=0, but you can override it. Under Players, add PlayerReimu. Under Bosses, add Tutorial Boss. Now we just have to link our stages, which need to be Stage Configs. You know the drill: right click > Create > Data > Stage Configuration. Add it under Stages. Opening it should show the following fields:
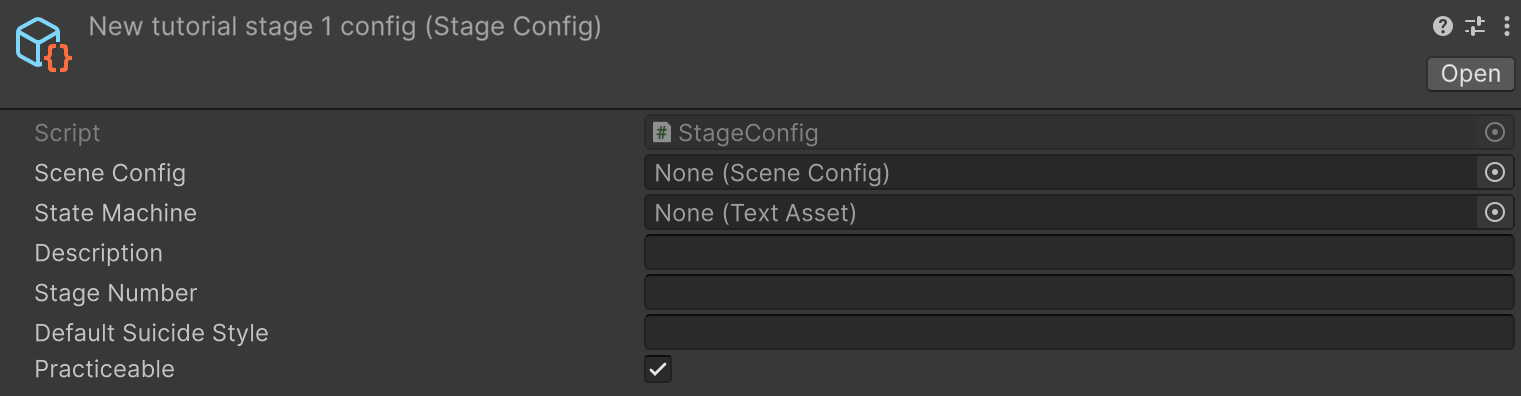
Link State Machine to the DMK Tutorial Example Stage Script that we worked on earlier. This is the source of truth for the stage script, not the Behavior Script field on Level Controller. The fields on Level Controller are completely ignored while playing the game from a main menu.
You can fill in anything for Description, and Stage Number should ideally be a number (it'll show up in the practice menu). As you can probably guess, there's one more layer of indirection here: we need a SceneConfig to link the Unity scene used for the stage. You can use the existing Example Stage scene config, which links to the Example Stage scene by name. Now, we can finally run the main menu scene!
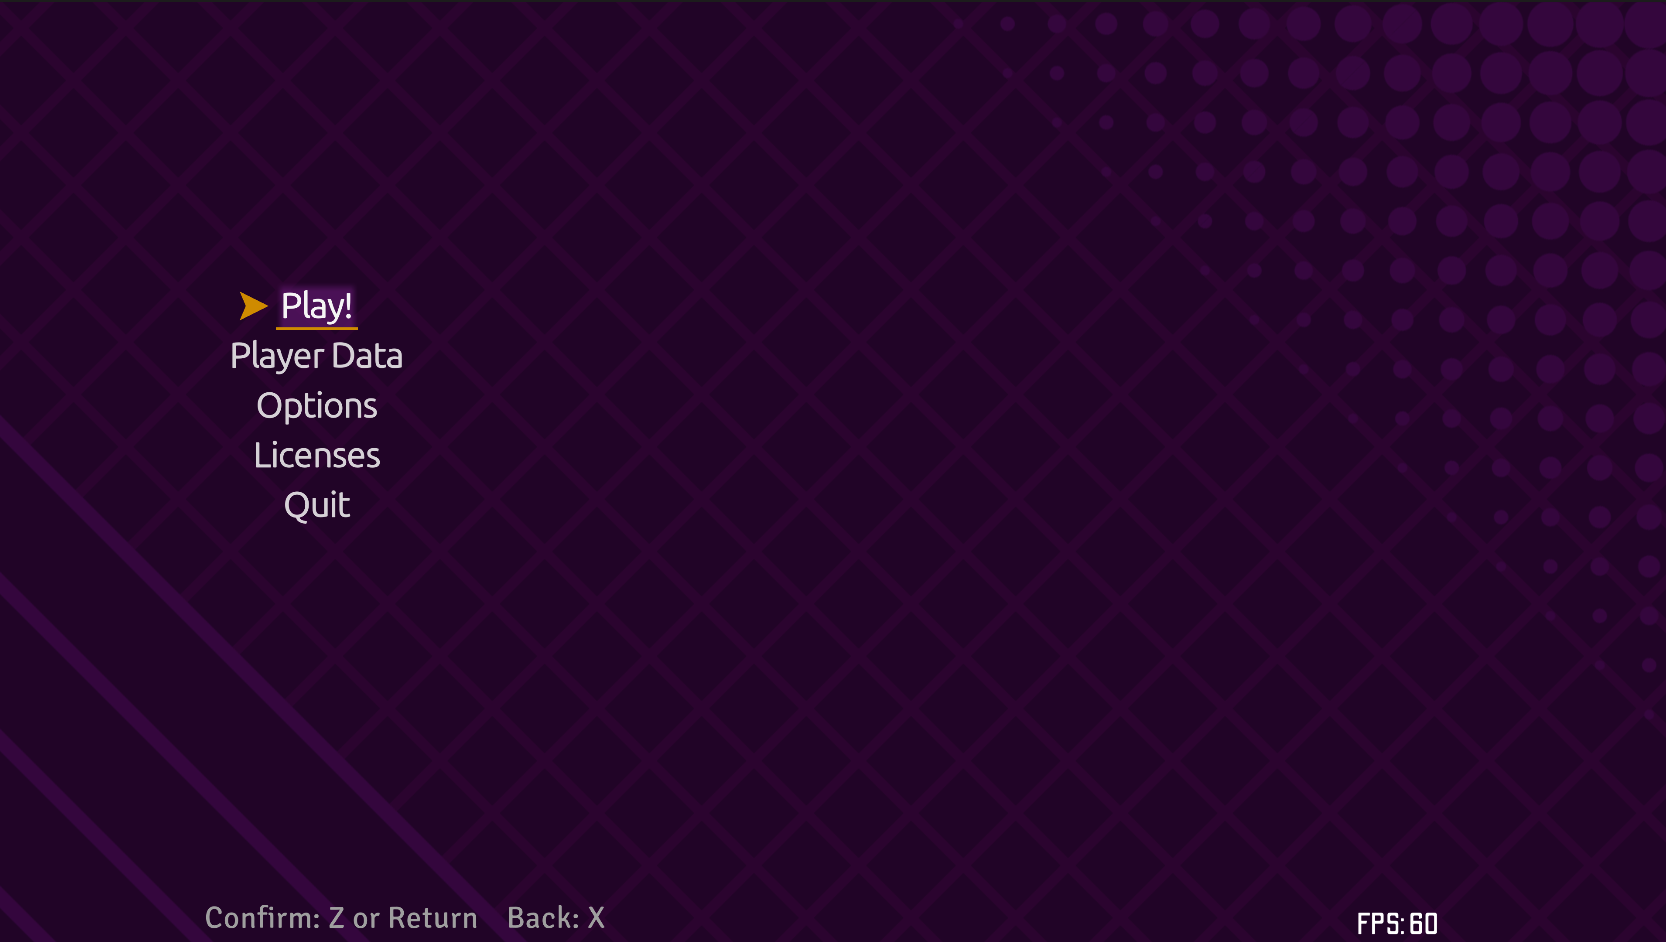
Make sure to add Example Main Menu, Example Stage, and Example Stage 2 to the build profile scene list. Also make sure that Danmokou/Scenes/Generic/(BaseLevel,Endcard,ReplaySave) are enabled in the scene list. Then, if you click "Play", you'll see a "Main Scenario" option (for the main campaign we just added), as well as two practice modes which are grayed out since the campaign hasn't been completed yet. (The logic for this UI is in the XMLMainMenuCampaign script.) You can click through the Main Scenario option to play the single stage that we wrote earlier. After the stage is complete, you'll be redirected to the replay save menu, and after that you'll be sent back to the main menu. Now, you'll be able to practice either the boss cards or the stage segments in the practice menus.
This gives us a single-stage campaign. Extending this to a multi-stage campaign is easy: we simply add more StageConfigs to the CampaignConfig. Try creating a new StageConfig; you can use the Example Stage 2 SceneConfig and either use the same stage script or create a new one. Now if you run the main campaign, the stages will be run in sequence with a loading screen in between. Example Stage 2 has a different background to distinguish it from the first stage.
- You do not need to add the stage script to the LevelController in
Example Stage 2. The source of truth for the stage script is in the StageConfig.
The built-in logic for adding endings is simple: after all stages are complete, the campaign looks through all the EndingConfigs in the Endings list on CampaignConfig in order, and the first one that "matches" is selected. If you open the Example Ending object, you'll see three fields: a key (used for identification), a state machine (which is what is executed in a new scene for the ending), and a predicate (which is used for matching). A predicate of true will always match. You could alternatively use a predicate like is1cc to check if the player is running a no-continue clear. The Example Ending No-hit object uses the predicate isnohit to check that the player is running a no-hit clear. Try adding both to the campaign config (make sure the no-hit one is first) and running through the campaign with and without a no-hit clear.
More Complex Stage/Ending Routing
If you have nonlinear stage routing or your ending choice criteria are not easy to encode, then you can encode your routing logic directly in C#. To do this, create a subclass of BaseCampaignConfig and override the RunEntireCampaign method. The CampaignConfig class has the default (linear) implementation:
public override async Task<InstanceRecord> RunEntireCampaign(InstanceRequest req, SMAnalysis.AnalyzedCampaign c) {
	//...
	for (int ii = 0; ii < stages.Length; ++ii) {
		for (Checkpoint? ch = null;;) {
			switch (await LoadStageSceneOrThrow(req, ii, ch).Task) {
				case InstanceStepCompletion.Cancelled:
					Logs.Log($"Campaign {c.campaign.Key} was cancelled.", true, LogLevel.INFO);
					throw new OperationCanceledException();
				case InstanceStepCompletion.RestartCheckpoint restart:
					ch = restart.Checkpoint;
					ii = stages.IndexOf(restart.Checkpoint.Stage as StageConfig);
					break;
				default:
					goto next_stage;
			}
		}
		next_stage: ;
		InstanceRequest.StageCompleted.OnNext((Key, ii));
	}
	if (TryGetEnding(out var ed)) {
		var blockRestart = req.CanRestartStage.AddConst(false);
		await LoadStageSceneOrThrow(req, new EndcardStageConfig(ed.stateMachine, c.Game.Endcard), null).Task;
		blockRestart.Dispose();
		return FinishCampaign(req, ed.key);
	} else
		return FinishCampaign(req);
}
The stage logic is somewhat complex due to support for checkpoints, but observe that it basically iterates through the stages one-by-one, and at the end runs some logic over the EndingConfigs to try to determine what ending to load. Instead of this, you can define a custom stage ordering or even skip stages. Furthermore, you don't even need EndingConfig— the only requirements for running an ending are determining what state machine to pass to EndcardStageConfig and what identifier key to pass to FinishCampaign. You can use any method you like to determine these.
- Note that the default practice menu logic, which determines whether a boss/stage is visible in the practice menu only by checking whether or not its containing campaign has ever been completed, may not be appropriate for cases where stages might be skipped.
That's all for this tutorial!